
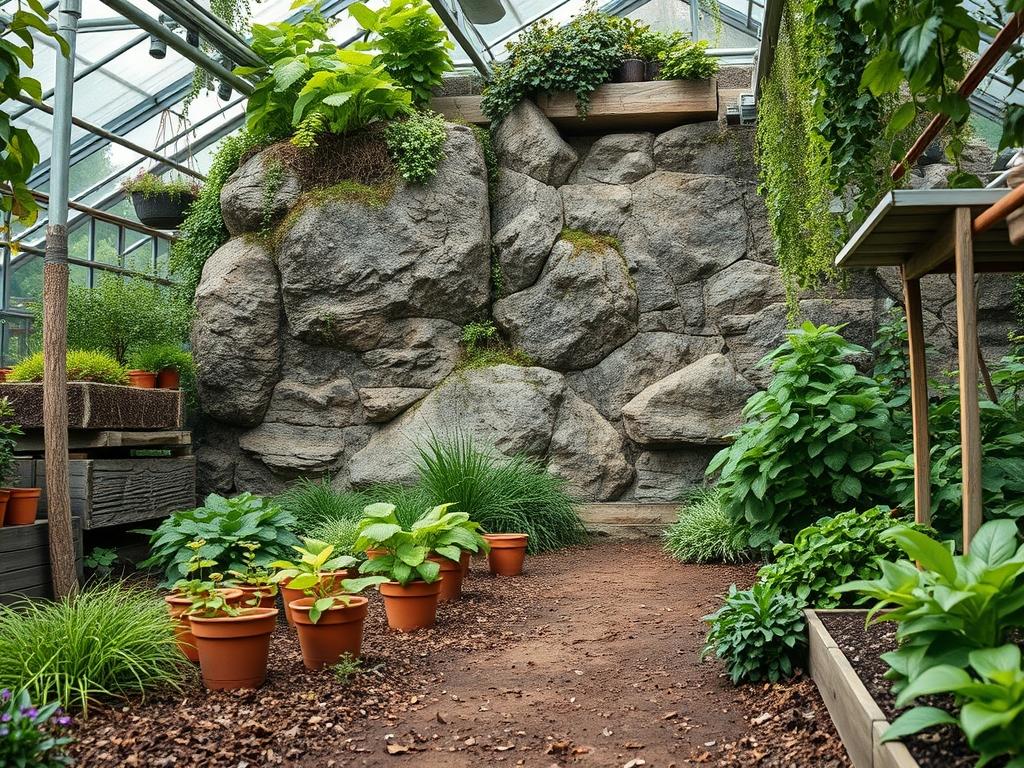
Designing a functional play space within a sophisticated residential landscape requires a delicate balance between engineering precision and aesthetic harmony. Integrating backyard rock climbing walls into a private garden is no longer merely a matter of mounting plywood to a fence. As modern outdoor living trends shift toward multi generational functionality, the challenge for the landscape architect lies in making these vertical structures feel like a deliberate part of the environment rather than an industrial afterthought. We must consider the existing topography, the prevailing wind patterns that might affect a climbing child, and the visual weight of the wall itself against the backdrop of the home. A well placed climbing feature can serve as a striking focal point, but it requires careful attention to drainage, material durability, and the surrounding softscape to ensure safety and longevity.
Climate considerations play a vital role in long term structural integrity. In regions with high humidity or heavy seasonal rainfall, the selection of timber and hardware must account for moisture expansion and potential rot. Conversely, in arid environments, UV exposure can degrade plastic climbing holds and weaken certain types of structural adhesives. The goal is to create a seamless transition where the climbing wall acts as an extension of the hardscaping, perhaps integrated into a retaining wall or positioned near a tiered patio. When executed correctly, the project enhances curb appeal by showcasing a bespoke, high quality outdoor environment that prioritizes both health and design.
Landscape Design Principles
Successful integration begins with the principle of focal points and visual balance. A vertical climbing structure naturally draws the eye upward, which can disrupt the perceived horizon of a flat yard. To counter this, we use elevation layers and tiered planting. By surrounding the base of the wall with mid sized shrubs or ornamental grasses, you can “anchor” the structure to the earth. Symmetry is less important here than organic balance; if the wall is positioned on the left side of a garden, a significant specimen tree or a heavy stone bench on the right side provides the necessary visual weight to stabilize the composition.
Irrigation planning is frequently overlooked during the design of play zones. Standard spray heads should never be directed toward the climbing surface, as constant moisture will lead to algae growth, making the holds slippery and dangerous. Transitioning to a drip irrigation system for nearby plants ensures that the vegetation thrives without compromising the dry environment required for safe climbing. Furthermore, the walkway leading to the wall should be clearly defined. Using flagstone or decomposed granite for paths prevents the surrounding turf from being compacted by heavy foot traffic, maintaining the health of the root systems near the structure.
Plant and Material Selection
The following table outlines plants and materials that complement the high traffic, high impact nature of a climbing area. While the wall itself is a hardscape element, the surrounding “fall zone” requires soft, resilient materials that provide impact attenuation while remaining visually pleasing.
| Plant or Material Type | Sun Exposure | Soil Needs | Water Demand | Growth Speed | Maintenance Level |
| :— | :— | :— | :— | :— | :— |
| Blue Star Creeper | Full Sun to Part Shade | Well drained, moist | Moderate | Fast | Low |
| Engineered Wood Fiber | N/A (Safety Mulch) | Level ground | Low (Requires drainage) | N/A | Moderate |
| Liriope Muscari | Full Sun to Full Shade | Adaptable | Low | Medium | Very Low |
| Pea Gravel | N/A (Sub base) | Excavated pit | None | N/A | Low |
| Japanese Forest Grass | Part Shade to Shade | Organic, rich | Moderate | Slow | Low |
| Creeping Thyme | Full Sun | Sandy, poor soil | Low | Medium | Low |
Implementation Strategy
The first step in backyard rock climbing walls installation is rigorous grading. The area beneath the wall, known as the fall zone, must be excavated to a depth of at least 12 inches to accommodate safety surfacing. Before any mulch is added, the subgrade should be sloped at a 2 percent grade away from the wall to prevent water from pooling at the structural base. Install a heavy duty geotextile fabric over the soil to prevent weeds from puncturing the safety surface and to keep the substrate from mixing with the native earth.
For the wall itself, the use of pressure treated 4×4 posts or 6×6 posts is essential for any free standing design. These should be set in concrete footings below the frost line to prevent shifting during seasonal freeze-thaw cycles. The climbing surface, often constructed from 3/4 inch ACX plywood, should be coated with a textured, weather resistant outdoor paint or a specialized “deck grip” coating. When mounting the holds, use stainless steel T-nuts and zinc plated bolts to prevent rust streaks from staining the wall over time.
The transition between the play zone and the rest of the garden is best managed with steel edging or pressure treated timber borders. This keeps the safety mulch or impact attenuating foam contained. For a professional finish, apply a layer of shredded cedar mulch around the perimeter of the safety pit. This provides a natural aroma and a clean aesthetic that blends the transition from play area to ornamental garden.
Common Landscaping Failures
One of the most frequent errors is improper drainage within the fall zone. If the excavated pit lacks a French drain or a perforated pipe system, it becomes a basin for rainwater. This leads to “clumping” of wood fibers or the growth of mold in rubber mulches, both of which reduce the impact absorbing properties of the material. Furthermore, soil compaction around the base of the wall can suffocate the roots of nearby trees. Always maintain a “critical root zone” radius where no heavy construction or high impact play occurs.
Root overcrowding is another systemic issue. Many homeowners plant fast growing privacy screens too close to the climbing wall. Within three years, the root systems can heave the concrete footings, causing the wall to tilt and become structurally unsound. Ensure that any large shrubs or trees are planted at a distance equal to at least half of their mature canopy spread. Finally, ignoring irrigation inefficiencies can lead to “backsplash” where mud from the garden beds stains the lower portion of the wall, leading to wood rot and unsightly discoloration.
Seasonal Maintenance
Spring is the primary season for safety audits. Inspect all climbing holds for cracks and use an Allen wrench to tighten any bolts that may have loosened during winter temperature fluctuations. This is also the time to “fluff” the engineered wood fiber to restore its impact attenuation. Over time, mulch becomes compacted and loses its ability to cushion falls; a quick raking can restore its safety rating.
During the summer, focus on moisture management. If the wall is in a high sun area, check the panels for “checking” or small cracks in the wood grain. Applying a clear, UV resistant sealer every two years will extend the life of the plywood significantly. In autumn, clear all fallen leaves from the safety pit. Decomposing organic matter creates a “soil” layer on top of your mulch, which encourages weed growth and ruins the drainage capacity of the pit.
Winter management depends on your climate. In snowy regions, it is often best to remove the lower climbing holds to discourage unsupervised use when the safety surface might be frozen and hard. If the wall is free standing, ensure the timber is not sitting in standing water or snowbanks for extended periods. A simple level check each spring will tell you if the ground shifted during the winter.
Professional Landscaping FAQ
What is the best ground cover for safety?
Engineered Wood Fiber is the gold standard for residential play. Unlike standard bark mulch, it is processed to have knitted fibers that provide better impact absorption and stable footing. It must be maintained at a depth of 9 to 12 inches.
How do I prevent the wall from rotting?
Ensure a minimum 2 inch gap between the bottom of the climbing panels and the mulch surface. This prevents “wicking” where the plywood sucks up moisture from the ground. Use stainless steel hardware to avoid structural failure due to corrosion.
Can I attach a climbing wall to my house?
It is possible but requires a ledger board similar to a deck. You must ensure the wall can handle the lateral loads. Consulting a structural engineer is recommended to prevent damage to the home’s siding or moisture barrier.
What plants are safest near play areas?
Avoid any species with thorns, berries, or brittle branches. Liriope muscari and Blue Star Creeper are excellent because they are durable, non toxic, and can handle occasional trampling without dying. They also provide a lush, green frame for the structure.
How much space do I need for a fall zone?
A safe fall zone should extend at least 6 feet in all directions from the climbing surface. If the wall is taller than 8 feet, increase the perimeter to accommodate the potential trajectory of a falling climber.