
Creating a high-performance outdoor environment requires a sophisticated balance between aesthetic appeal and ecological utility. For years, the residential landscaping industry prioritized monoculture turf and sterile ornamental displays that offered little to the surrounding environment. Moving toward sustainable backyard bee habitats represents a shift in design philosophy; we are no longer just decorating a site, we are engineering a living system. A well-designed pollinator habitat enhances curb appeal by introducing dynamic textures and seasonal color shifts that traditional lawns cannot match. It also addresses critical landscaping challenges such as stormwater management and soil health. By selecting native species and structuring the environment with architectural intent, homeowners can transform an underutilized yard into a thriving sanctuary that increases property value and supports local biodiversity.
The modern landscape architect must consider climate resilience as a primary factor in site planning. As weather patterns become more unpredictable, the use of native plants becomes a strategic necessity rather than an optional trend. These species have evolved to thrive in local soil conditions and moisture levels, which significantly reduces the need for supplemental irrigation and chemical fertilizers. Integrating backyard bee habitats into a master plan allows for a more functional use of the space, moving away from high-maintenance “mow-and-blow” cycles toward a sophisticated, layered environment. This approach provides a sensory experience for the inhabitant while serving the essential needs of native bees; many of which are specialists needing specific flora to survive.
Landscape Design Principles
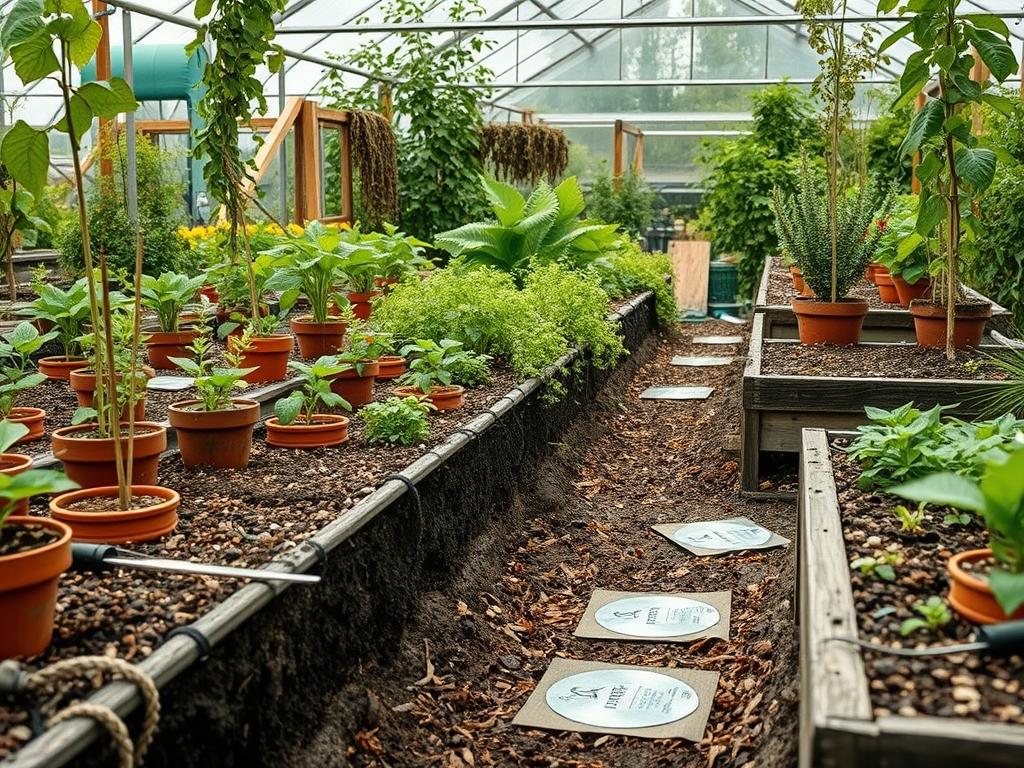
Professional landscape design relies on the core principles of symmetry, focal points, and vertical layering to create a sense of order. When designing backyard bee habitats, we use these principles to ensure the space feels intentional and polished rather than overgrown. We start with the concept of vertical layering, which mimics a natural forest edge. This involves planting a canopy of Native Trees, an understory of Flowering Shrubs, and a ground layer of Herbaceous Perennials. This layering provides different niches for various bee species, from those that nest in tree hollows to those that burrow in the soil.
Symmetry and visual balance are achieved by framing the wilder, nectar-rich zones with structured hardscaping elements. Using a Steel Edger or a Hand-Hewn Stone Border creates a crisp line that signals to the viewer that the native plantings are a deliberate design choice. Focal points should be used to draw the eye through the garden. A large Natural Stone Water Feature or a high-quality Artisan Bee Hotel can serve as a centerpiece. These structures provide essential hydration and nesting sites while acting as sculptural elements in the landscape.
Irrigation planning and walkways are the circulatory system of the backyard. Instead of a traditional broadcast sprinkler system, we utilize Drip Irrigation Lines buried under the mulch to deliver water directly to the root zones. This minimizes evaporation and prevents the fungal issues that occur when foliage stays wet. Walkways should be constructed from permeable materials like Crushed Granite or Flagstone, allowing rainwater to infiltrate the ground rather than running off into the street. This recharge of the local water table is essential for maintaining the underground moisture levels that many ground-nesting bees require during the heat of summer.
Plant and Material Selection
| Plant Type | Sun Exposure | Soil Needs | Water Demand | Growth Speed | Maintenance Level |
| :— | :— | :— | :— | :— | :— |
| Purple Coneflower (Echinacea) | Full Sun | Well-Drained | Low | Moderate | Low |
| Wild Bergamot (Monarda) | Full to Part Sun | Rich/Moist | Moderate | Fast | Moderate |
| Goldenrod (Solidago) | Full Sun | Average/Dry | Low | Fast | Low |
| Blue False Indigo (Baptisia) | Full Sun | Deep/Dry | Low | Slow | Very Low |
| Serviceberry (Amelanchier) | Part Shade | Acidic/Loamy | Moderate | Moderate | Moderate |
| Smooth Blue Aster | Full Sun | Clay/Loam | Moderate | Fast | Low |
Implementation Strategy
The successful implementation of backyard bee habitats begins with thorough site preparation. We start by using a Transit Level to determine the grading and slope of the property. Proper grading ensures that water moves away from the home foundation while settling into designated “rain garden” bioswales where moisture-loving plants can thrive. Once the grade is established, we remove existing turfgrass using a Sod Cutter or by sheet mulching with Heavy-Duty Cardboard to suppress weeds without the use of herbicides.
After the site is cleared, we analyze the soil composition. If the ground is heavy in clay, we may incorporate Expanded Shale or Organic Compost to improve aeration and drainage. We then lay out the garden beds according to the master plan, using Inverted Marking Paint to trace the curves of the borders. Edging is then installed to a depth of 4 inches to prevent grass from encroaching into the habitat zones.
Planting follows a specific sequence. We install the largest specimens first, such as Native Oak or Willow Trees, followed by shrubs and then the smaller perennials. When placing plants, we group them in “drifts” of at least five to seven of the same species. This makes it easier for bees to identify a food source from a distance and simplifies the foraging process. Finally, we apply a 3-inch layer of Shredded Hardwood Mulch or Pine Bark. This mulch retains moisture, suppresses opportunistic weeds, and eventually breaks down to enrich the soil. We leave certain small patches of bare earth in sunny spots for ground-nesting bees, which comprise about 70 percent of our native bee populations.
Common Landscaping Failures
One of the most frequent failures in backyard bee habitats is improper drainage. Many homeowners assume that “natural” means “boggy,” but most pollinator-friendly plants require excellent drainage to prevent root rot. If the soil remains saturated for more than 24 hours after a rain event, the site likely needs a French Drain or a specialized drainage tile system to move excess water. Another common mistake is root overcrowding. Designers often want an “instant” garden and plant too densely; neglecting the mature spread of the species. This leads to poor air circulation, which invites powdery mildew and stunts the growth of the plants.
Soil compaction is a silent killer in many residential landscapes. During construction, heavy machinery can crush the pore spaces in the soil, making it impossible for roots to penetrate or for ground-nesting bees to burrow. We utilize a Broadfork or Core Aerator to alleviate this compaction before any planting begins. Irrigation inefficiencies also pose a threat. Over-watering not only wastes resources but can actually dilute the sugar content in flower nectar, making the habitat less nutritious for the bees. Finally, the use of systemic pesticides is a catastrophic failure in a bee habitat. Even “organic” sprays can be harmful if applied when bees are active; therefore, we rely on Integrated Pest Management (IPM) and physical barriers rather than chemical interventions.
Seasonal Maintenance
Spring maintenance is about patience. We advise clients to wait until temperatures are consistently above 50 degrees Fahrenheit before cleaning up the garden. Many native bees overwinter in the hollow stems of last year’s perennials or under the leaf litter. Removing this debris too early can kill the next generation of pollinators. Once it is warm enough, we use Pruning Shears to cut back dead stalks, leaving about 12 inches of the stem standing to provide nesting sites for the coming year.
During the summer, the focus shifts to water management and deadheading. While many native plants are drought-tolerant, young plants need consistent moisture for their first two growing seasons. We check the Soil Moisture Meter regularly to ensure the root balls are not drying out. Deadheading spent blooms on certain species can encourage a second flush of flowers, extending the foraging window for the bees. However, we leave some seed heads intact for birds and for self-seeding.
Autumn is the season for “clean-as-you-go” and planting. This is the best time to install new trees and shrubs, as the cooler temperatures allow roots to establish without the stress of summer heat. We also leave the fallen leaves on the beds rather than bagging them. This “leaf mulch” provides a critical insulation layer for overwintering queen bees and other beneficial insects. In winter, maintenance is minimal. We focus on structural pruning of woody plants using Long-Reach Loppers and monitor for any drainage issues that might arise during winter thaws.
Professional Landscaping FAQ
How much space do I need for a bee habitat?
You can create a functional habitat in as little as 10 square feet. Even a small cluster of native perennials provides a significant “pit stop” for foraging bees within an urban or suburban landscape corridor.
Will a bee habitat increase the risk of stings?
Native bees are generally non-aggressive and rarely sting unless physically crushed. They are focused on gathering pollen and nectar, not defending a hive like social honeybees. They are safe to have near walkways and patios.
Do I need to buy a honeybee hive?
No. Sustainable backyard habitats focus on supporting native, solitary bees. These species are often more efficient pollinators than honeybees and do not require the intensive management, equipment, or specialized knowledge that beekeeping demands.
Can I use decorative wood chips for mulch?
We recommend Double-Shredded Hardwood Mulch because it stays in place and improves soil biology. Avoid “rubber mulch” or dyed chips, as these can leach chemicals and provide no nutritional benefit to the soil ecosystem.
How long until the habitat is established?
Most native perennial habitats reach maturity in three years. The first year focuses on root development; the second year shows significant foliage growth; and the third year provides a full, vibrant display of blooms and activity.