
Creating a resilient and balanced outdoor environment requires more than just aesthetic plant placement and high-quality hardscaping. Professional landscape architecture often integrates biological pest control and ecological niches to reduce the reliance on synthetic chemicals. One of the most effective, though frequently overlooked, methods for maintaining a healthy garden ecosystem is the strategic implementation of Backyard Toad House Construction. From a design perspective, these structures offer an opportunity to blend functional sculpture with habitat restoration. Toads are a cornerstone of integrated pest management; a single adult can consume thousands of insects, including slugs, beetles, and flies, over a single growing season. By incorporating dedicated amphibious habitats into your landscape plan, you address long-term sustainability goals while enhancing the biological diversity of your property. This process involves careful consideration of microclimates, moisture retention, and proximity to existing irrigation zones to ensure the habitat is both welcoming and effective.
Landscape Design Principles
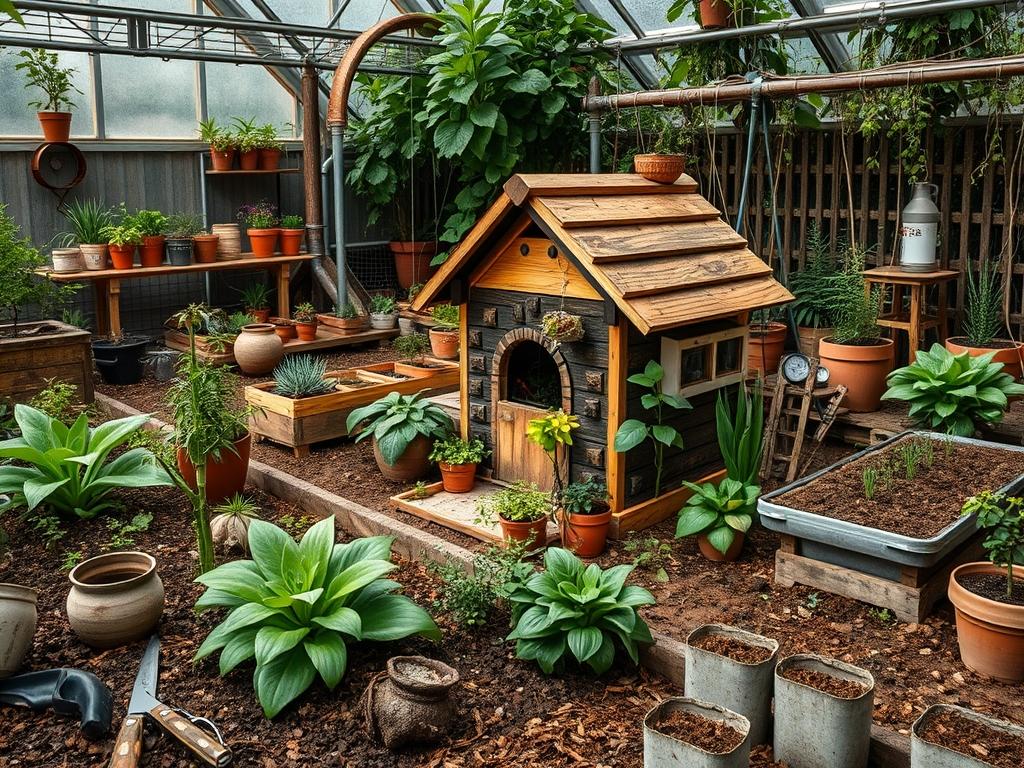
Successful landscape design rests on the balance between form and function, particularly when integrating wildlife habitats into a managed backyard. When planning for Backyard Toad House Construction, symmetry and focal points play a vital role. You might choose to place a decorative ceramic toad house at the end of a primary sightline, or perhaps tucked discreetly within a layered planting bed to create a sense of discovery. Visual balance is achieved by mirroring the height of the shelter with surrounding foliage, ensuring the structure does not look like an afterthought.
Elevation and grading are critical at the design stage. Toads require cool, damp environments, so these houses should be situated in low-lying areas or depressions where moisture naturally accumulates. However, proper drainage must be maintained to prevent stagnant water from becoming a breeding ground for harmful bacteria. For a professional finish, integrate the house near retaining walls or under the shade of a large focal point tree. Using a variety of elevation layers, such as mounded soil or natural stone outcroppings around the house, creates a sense of protection and mimics a natural woodland floor.
Irrigation planning must also be synchronized with these habitats. Micro-sprayers or drip emitters should be positioned near the toad house to maintain a consistent humidity level. Avoid placing houses in the center of high-traffic turf areas where lawnmowers or foot traffic could disturb the residents. Instead, utilize the “edge effect” by placing habitats along the transition zones between manicured lawns and dense garden beds. This provides a safe corridor for toads to move between hunting grounds and their sanctuary.
Plant and Material Selection
The following table outlines the botanical and structural components necessary to support a thriving backyard habitat. Choosing plants that provide dense ground cover and moisture retention is essential for the success of your project.
| Plant Type | Sun Exposure | Soil Needs | Water Demand | Growth Speed | Maintenance Level |
| :— | :— | :— | :— | :— | :— |
| Hostas | Partial to Full Shade | Loamy, Organic | Moderate | Fast | Low |
| Ostrich Fern | Full Shade | Consistent Moisture | High | Medium | Medium |
| Creeping Jenny | Sun to Shade | Wet, Well-drained | High | Aggressive | High (Trimming) |
| Wild Ginger | Full Shade | Acidic, Moist | Moderate | Slow | Low |
| Moss Phlox | Sun to Partial Shade | Gritty, Sandy | Low | Medium | Medium |
| Japanese Painted Fern | Shade | Rich, Humus-heavy | Moderate | Medium | Low |
For the construction materials, professionals recommend using terracotta pots, natural slate, or concrete pavers. These materials have high thermal mass, which helps regulate the temperature inside the house during hot summer afternoons. Avoid using pressure-treated lumber or cedar, as the chemicals and natural oils can be toxic to the sensitive, permeable skin of amphibians.
Implementation Strategy
The construction and placement of a toad house should be treated with the same precision as installing a small hardscape feature. Begin by identifying a site that receives less than 3 hours of direct sunlight daily. This is usually the north side of a building or under a dense canopy of evergreen shrubs.
1. Site Preparation and Grading: Clear an area approximately 12 inches by 12 inches. Level the soil to ensure the house sits flat, but ensure the surrounding grade slopes slightly away to prevent significant flooding during heavy rains. Dig a small depression about 2 inches deep where the house will sit; this allows the toad to burrow into the cool earth.
2. Shell Construction: Use a 8-inch terracotta pot and carefully chip a 2-inch wide semicircular opening into the rim using a hammer and chisel. You may also invert the pot and prop up one side using a flat river stone. If you prefer a more architectural look, stack flat pieces of fieldstone to create a cave-like structure, ensuring the top stone is heavy enough to remain stable during wind or surface runoff.
3. Interior Substrate: Fill the interior of the house with 1 inch of loose, moist soil mixed with a small amount of finely shredded leaf mulch. This provides a substrate for the toad to settle into. Avoid using large wood chips inside the house, as these can be abrasive.
4. Integration and Edging: Surround the exterior of the house with 3 inches of hardwood mulch or river rock to suppress weeds and maintain soil moisture. Plant low-growing ground covers, such as Creeping Jenny, around the entrance to provide a “front porch” of greenery that protects the toad from predators while it enters or exits.
5. Drainage and Hydration: If your garden lacks natural moisture, bury a small shallow ceramic saucer near the entrance, flush with the ground level. Fill it with water and place a few small pebbles inside so the toad can climb out easily. This serves as a hydration station.
Common Landscaping Failures
One of the most frequent mistakes in habitat construction is poor drainage. If a toad house is placed in a clay-heavy depression without any percolation, it will fill with water during rainstorms, effectively drowning the inhabitant or forcing it to abandon the site. Always ensure the sub-base is amended with pea gravel if the local soil is poorly draining.
Another failure is the use of chemical fertilizers and pesticides. Because toads have highly absorbent skin, even small amounts of lawn chemicals can be lethal. If you are building a toad house, you must commit to an organic or near-organic maintenance routine in that specific garden zone.
Improper spacing is also a common issue. Placing a toad house too far from dense plant cover leaves the toad vulnerable to birds and snakes. The house should be “tucked in” rather than standing alone on a mulch bed. Finally, using the wrong materials, such as plastic containers, is a significant error. Plastic does not breathe and can overheat quickly, creating a greenhouse effect that is dangerous for amphibians.
Seasonal Maintenance
To ensure the longevity of your Backyard Toad House Construction, follow a seasonal management schedule. In the Spring, inspect the house for structural integrity. Remove any debris, such as compacted leaves or twigs, that might have blocked the entrance over the winter. This is also the time to refresh the interior soil.
During the Summer, focus on hydration. Check the nearby water saucer daily and refill it as needed. Ensure that the surrounding plants are not overgrown to the point where they completely seal off the entrance. If the weather is exceptionally dry, lightly mist the area around the house during your evening irrigation cycle.
In the Autumn, allow fallen leaves to accumulate naturally around the base of the house. This provides an extra layer of insulation against the coming frost. Do not disturb the house if you see a toad has already begun to burrow for the season.
Winter maintenance is minimal, as the toads will be in a state of brumation. Ensure that heavy snow piles from shoveling or plowing are not dumped on top of the habitat, as this can compact the soil and crush the burrow. If the house is made of ceramic and you live in a region with extreme freeze-thaw cycles, ensure it is high-quality frost-resistant terracotta to prevent cracking.
Professional Landscaping FAQ
Where is the best place to put a toad house?
Place the structure in a consistently shaded, damp area near dense vegetation. North-facing garden beds or spots under low-hanging shrubs provide the necessary cool microclimate and protection from predators like hawks or snakes.
What materials should I avoid for the house?
Avoid pressure-treated wood, cedar, and plastic. These materials either contain toxins or do not allow for proper temperature and moisture regulation. Stick to natural stone, unglazed terracotta, or concrete for the most hospitable environment.
How do I clean a toad house safely?
Clean the house once a year in early spring using only plain water and a stiff brush. Never use soap or bleach, as chemical residues can be absorbed through the toad’s skin and cause illness or death.
How big should the entrance be?
An entrance should be approximately 2 inches wide and 1.5 inches high. This is large enough for an adult toad to enter but small enough to prevent larger predators from reaching inside the shelter.
Do I need a water feature nearby?
While not strictly required, a shallow water source increases the likelihood of habitation. A 4-inch ceramic saucer buried flush with the soil provides essential hydration and helps toads regulate their body temperature during peak summer heat.