
Designing high quality Backyard Screen Room Layouts requires a sophisticated understanding of how architectural footprints intersect with natural ecosystems. A screen room is not merely an isolated box appended to a porch or patio; it is a transitional environment that must balance seasonal climate fluctuations, site specific drainage requirements, and the desired level of privacy. When homeowners overlook the surrounding landscape, these structures often feel disconnected. In more severe cases, they suffer from poor air circulation and water intrusion. Successful design focuses on enhancing curb appeal while creating a functional sanctuary that mitigates the intensity of direct sun and wind. From a consultant’s perspective, the primary challenge lies in managing the immediate perimeter to ensure that the foundation remains stable and the vegetation thrives without compromising the integrity of the screens or the structural framing.
Thermal comfort is a significant factor when planning your layout. In warmer climates, the orientation of the screen room relative to the afternoon sun determines whether the space remains usable during peak heat. Integrating deciduous trees such as Red Maple or River Birch on the western side can provide essential summer shade while allowing light to penetrate during the winter months after the leaves have fallen. Furthermore, the aesthetic impact on the home’s value cannot be overstated. A well integrated screen room that uses materials matching the existing architecture, combined with a thoughtful planting plan, creates a cohesive look that suggests the space was always part of the original master plan rather than an afterthought.
Landscape Design Principles
Effective layout planning starts with visual balance and the strategic use of focal points. Symmetry can be used to create a formal, classic appearance by flanking the entrance to the screen room with identical terracotta planters or boxwood hedges. Conversely, an asymmetrical approach offers a more organic feel that blends into the broader garden. Elevation layers play a critical role here. Using retaining walls constructed from natural stack stone or interlocking concrete blocks allows for the creation of tiered planting beds that draw the eye upward from the ground level. This verticality provides a sense of enclosure within the room without blocking the view entirely.
Walkways should be designed with both utility and aesthetics in mind. Paths leading to the screen room should be at least 48 inches wide to allow for comfortable passage of two people. Materials like flagstone, decomposed granite, or sand set pavers provide a stable surface while allowing for slight permeability. Irrigation planning must be meticulously integrated into the layout to ensure that water is directed away from the structure. Drip irrigation systems are generally preferred for the immediate perimeter. They deliver water directly to the root zones of native plants, which reduces the risk of overspray hitting the mesh screens and causing mineral buildup or premature rot on wooden frames.
Visual weight must also be distributed evenly. If one side of the screen room is heavily planted with tall thuja standishii x plicata, the other side should have a balancing feature, such as a large granite boulder or a group of medium height ornamental grasses. This prevents the structure from looking like it is leaning or improperly anchored to the site. Finally, consider the sightlines from within the room. The layout should frame the best views of the yard while using dense foliage to obscure less attractive elements like HVAC units, utility meters, or neighboring properties.
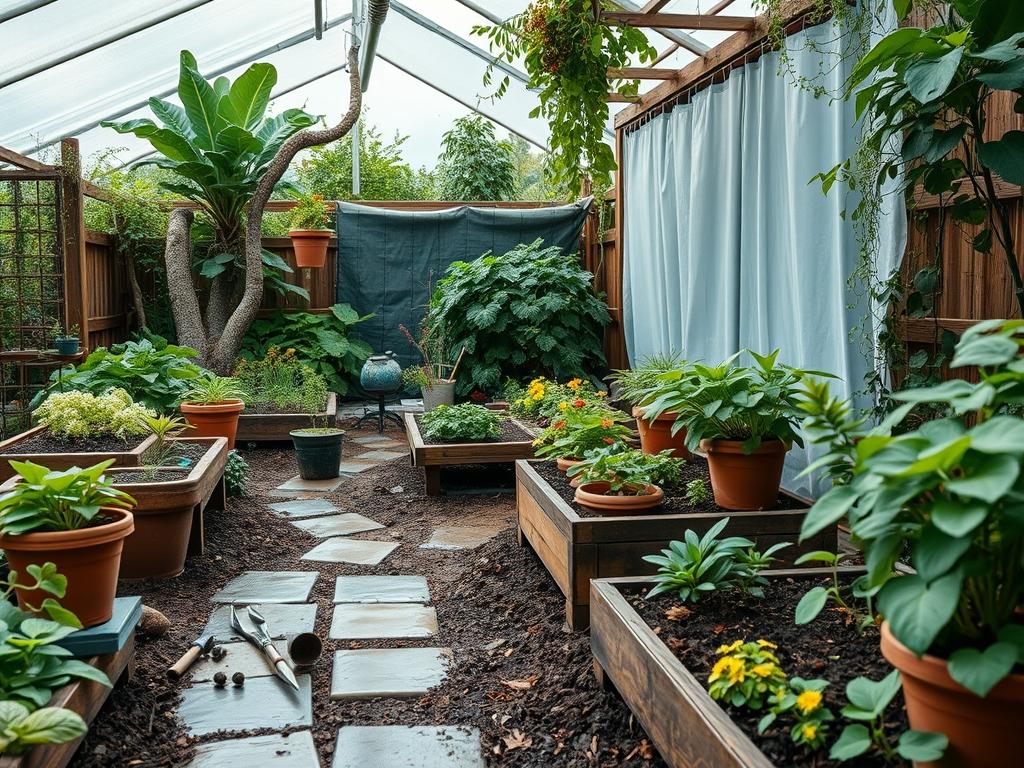
Plant and Material Selection
Selecting the right biological and hardscape components is essential for long term sustainability. The following table provides a guide for common plants used to enhance the perimeter of Backyard Screen Room Layouts.
| Plant Type | Sun Exposure | Soil Needs | Water Demand | Growth Speed | Maintenance Level |
| :— | :— | :— | :— | :— | :— |
| Emerald Green Arborvitae | Full Sun | Well-drained | Medium | Moderate | Low |
| Hostas (Various Species) | Full Shade | Rich, Organic | Medium to High | Fast | Low |
| Panicle Hydrangea | Part Sun | Loamy/Moist | High | Fast | Medium |
| Blue Star Juniper | Full Sun | Sandy/Dry | Low | Slow | Very Low |
| Japanese Forest Grass | Part Shade | Consistently Moist | Medium | Moderate | Low |
| Dwarf Palmetto | Part Sun | Adaptable | Medium | Slow | Low |
| Lavender | Full Sun | Gritty/Alkaline | Very Low | Moderate | Medium |
Implementation Strategy
The process of bringing Backyard Screen Room Layouts to life begins with thorough site preparation. First, you must establish the finished floor elevation of the screen room. The surrounding ground should be graded to a 2 percent slope away from the foundation for at least 10 feet. This prevents hydrostatic pressure from building up against the base of the structure. Use a laser level or string level to ensure the grade is consistent. If the yard naturally slopes toward the screen room, you must install a french drain or a dry creek bed using river rock and non-woven geotextile fabric to divert runoff.
Once the grading is complete, the hardscaping phase begins. If the layout includes a wrap-around path or a connected patio, excavation should reach a depth of at least 8 inches to accommodate a 6-inch layer of compacted 21A or CR-6 crushed stone base. This base is the foundation of your hardscape and prevents the settling or shifting of pavers. After the base is compacted with a power tamper, a 1-inch layer of concrete sand is spread to provide a leveling bed for the final surface material. Plastic edge restraints should be spiked into the ground to keep the pavers from migrating over time.
Planting should follow the hardscaping. Begin by placing the largest specimens first, such as privacy trees or large shrubs. When digging holes, ensure they are twice as wide as the root ball but no deeper. This encourages lateral root growth. Mix the native soil with organic compost at a 1 to 3 ratio to improve nutrient availability. After planting, apply a 3-inch layer of shredded hardwood mulch across the entire bed. This mulch layer is vital for moisture retention and weed suppression, but it must be kept at least 2 inches away from the stems of plants and the foundation of the screen room to prevent fungal issues.
Common Landscaping Failures
One of the most frequent mistakes in backyard design is improper drainage planning. When a screen room is added, it often changes the flow of rainwater from the roof. If the existing gutters are not redirected or if the ground is not properly sloped, water can pool at the base of the screens. This leads to soil saturation, which can kill plants through root rot and eventually cause the foundation of the screen room to settle unevenly. Always ensure that downspout extensions carry water at least 5 feet away from the structure.
Root overcrowding is another common failure. Homeowners often plant evergreen trees too close to the screen room for immediate privacy. However, within five years, those trees may expand and push against the screens or the framing. This not only damages the structure but also creates a bridge for insects like ants and termites to enter the home. Always research the mature width of a plant and place it at least half that distance plus 2 feet away from any structural wall.
Soil compaction is often overlooked during the construction of the screen room itself. Heavy machinery and foot traffic can compress the soil to the point where air and water can no longer reach plant roots. Before planting, it is necessary to till the soil or use an aerator to break up the hardpan layer. Failure to do so will result in stunted growth and high plant mortality rates regardless of how much water or fertilizer is applied.
Seasonal Maintenance
Maintaining the integrity of Backyard Screen Room Layouts requires a disciplined seasonal approach. In the spring, the focus should be on cleaning and renewal. Inspect the screens for tears caused by winter storms and clear the gutters of any debris. This is also the time to apply a slow release fertilizer to the perimeter plants and refresh the mulch layers to maintain that 3-inch depth. Pruning should be performed on summer flowering shrubs like Hydrangeas to encourage new growth and better blooms.
Summer maintenance is largely centered on water management. During periods of extreme heat, even established plants may require supplemental irrigation. Monitor the soil moisture levels near the screen room carefully, as the structure can create a rain shadow that prevents natural rainfall from reaching the plants closest to the walls. Late summer is also a good time to check for any signs of pest infestation or fungal growth on the foliage that could be exacerbated by high humidity.
Autumn is the season for preparation. Clean out dead annuals and cut back perennial grasses once they turn brown. This is the best time to plant new trees or shrubs, as the cooler temperatures and increased rainfall help them establish roots before the ground freezes. Finally, in the winter, protect sensitive plants with burlap wraps if necessary and ensure that any irrigation systems are fully winterized by blowing out the lines with compressed air to prevent pipes from bursting in freezing temperatures.
Professional Landscaping FAQ
How do I choose the best location for a screen room?
Analyze the sun’s path and prevailing wind directions. You want to maximize shade during the hottest parts of the day while ensuring a cross breeze. Take note of proximity to the kitchen for easy access to food and drinks.
What is the best flooring material for a screen room?
Porcelain pavers or stamped concrete are excellent choices. They are durable, easy to clean, and resistant to moisture. For a warmer feel, consider composite decking or ipe wood, which are resistant to rot and insect damage in outdoor environments.
How do I prevent mosquitoes from getting under the floor?
If the room is built on a raised deck, install a fine mesh screen or landscaping fabric directly beneath the floorboards. This creates a secondary barrier that prevents insects from entering through the small gaps between the wood or composite planks.
Should I use native plants in my screen room layout?
Yes. Native plants are adapted to your local climate and soil conditions. They require less water and fewer chemical inputs once established. They also provide essential habitats for local pollinators, which enhances the overall health of your backyard ecosystem.
How far should I keep mulch from the screen room foundation?
Keep mulch at least 6 inches away from any wood siding or framing. This gap prevents moisture from wicking into the structure and discourages termites or other wood boring insects from finding a path into the screen room or the main house.